all micro contact rss

Anatomy of a Product Video Part 5

This is a series of posts about the making of my marketing video for Fin. You can see the other parts of the series by following the links below:

1 | 2 | 3 | 4 | 5 | 6 | 7 | 8 | 9 | 10

This is part five of a series about the making of a product marketing video for my app, Fin. The hope is that I can inspire others to try and make these kinds of videos for their own products, as I think they are pretty essential for selling apps to customers. We may not all have the budget to hire a pro team to make super-awesome videos for us, but we can make something worthwhile if we put in some time and effort, and a little bit of cash.

Grabbing the Footage from the Simulator

Now that I had the text in place, and I knew which shots I wanted to back up what I was saying with the text, the next task was actually capturing the footage of my app in motion. As I mentioned before, doing this with a video camera “over the shoulder” with a real iPad or iPhone was not going to work on such a small budget. The end result always looks too amateurish for my taste. So I needed to get all my screen footage from that great app we all get bundled with our paid developer accounts from Apple: the iPhone Simulator.

The reason I go with the Simulator, rather than a broadcasting app like Reflector or something similar is that the Simulator is faster and smoother. The whole point of this video is to show your app in motion, and that motion needs to be as smooth as possible. If your app has a lot of views sliding around, they can often drop frames in an app like Reflector. Don’t get me wrong; I love Reflector for giving live demos, but in this case, I just don’t think it’s the right tool for the job.

Of course, the issue with the Simulator is that it doesn’t look like the actual device. Not to worry; we’re going to fix that with a little video layering later. For now, we’re just going to get the screen action we need, and worry about the surrounding environment after.

This is one part of the process where having a big screened Mac, such as the 27-inch iMac, comes in handy. On an 11-inch Air, for instance, it’s hard to get a screen frame with enough pixels for our HD final video.

Of course, if you’re capturing Retina iPad motion, even a 27-inch iMac can’t show the entire screen at once. That’s where the Simulator’s zoom feature works well. I set that to 75% with the iPad Retina mode. It’s larger than the non-Retina mode, while still fitting on screen. That way, I get the biggest frame possible for my screen, so I can do more with camera pans and zooms in Final Cut Pro later.

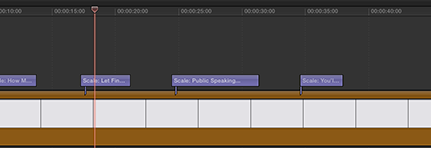
Fire up a screen grab app, such as ScreenFlow, and start capturing what you need. I recommend doing short takes. One three-or-four-second shot at a time, carefully setting up the iPad Simulator in between each take to get the screen to show exactly what you want. Don’t be lazy. Set up your screen to show off your app in the best possible light. The more time you take to carefully plan out your shots, the less time you’ll spend fiddling with your footage later.

Since Fin is a universal app, I did all my shots with the Simulator in iPad mode, then again in iPhone mode. That way, I could pick and choose which device to use on any particular shot later. One by one, with each line of text in my script, I took the corresponding screen grab, until the whole list was complete. You can always come back later for “pick-ups,” but I find that doing a shot, then bringing it into Final Cut, then doing the next shot, etc. is more taxing on the brain. Try and stick to one major step of the process at a time, if possible.

Getting Your Screen Grabs Into Final Cut Pro X

Now that you have all your footage saved in an app like ScreenFlow, you need to export all of it for use in Final Cut Pro X. Just as I like to do all my shots one at a time when grabbing, I like to export them all as separate files, too. Makes it easier for me to name each clip appropriately and sort them all out later. How you choose to do this is up to you. Feel free to export in larger chunks of multiple clips, if you find that more effective.

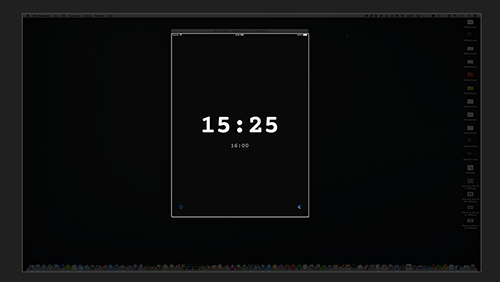
More importantly, what we need to export is just our screen from the iPhone Simulator. The rest of the desktop area we want to throw away. We also want to turn off any feature of the screen grab app that shows cursor movements.[1]

In ScreenFlow, you can crop your output to any size you like, which is very convenient. Just be sure you grab the screen exactly, with no extra frame around it. It needs to be superimposed onto an iPad or iPhone image later, after all, so getting the crop correctly is important. Check the aspect ratio of your crop to be sure it’s appropriate for your device type. You can re-crop again in Final Cut later, of course, but it’ll make your whole life easier if you get it right the first time.

Hopefully, your screen grab app of choice supports exporting at the best possible quality. We want our compression to happen at the end of the process if at all possible, not before it even gets to the cutting room. So I always choose Lossless Apple ProRes as my output from ScreenFlow at 100%. That way, I end up with shots that are all plenty large for at least 720p HD video with the device frame around it. Always better to have more pixels than we need.

Once you have all your clips, import them into Final Cut Pro X, and you’re almost ready to assemble. We’ll cover that in the next part of the series.

1 | 2 | 3 | 4 | 5 | 6 | 7 | 8 | 9 | 10

- - - - - -
  1. It’ll break the illusion that we’re watching actual products with iOS apps running really quick if we see a Mac cursor, after all.  ↩

Anatomy of a Product Video Part 4

This is a series of posts about the making of my marketing video for Fin. You can see the other parts of the series by following the links below:

1 | 2 | 3 | 4 | 5 | 6 | 7 | 8 | 9 | 10

This is part four of a series detailing the process I used to make a product marketing video for my app, Fin. The hope is that I can inspire others to try and make these kinds of videos for their own products, as I think they are pretty essential for selling apps to customers.

So far, we’ve gotten our tools and written up a nice script. We now have to make a practical choice before moving forward in beginning to craft the actual video.

To Use Voice or Not to Use Voice?

Once I had my script written, I had an important choice to make. Was I going to read these lines as a voice over script, or print the words onto the screen? Or both?

Personally, I’m a big fan of leaving the majority of my computing devices on mute. I almost never want my computer to make noise. I assume a lot of other people do the same. So even when watching most product videos, I tend to leave the sound off, unless I know the sound is really important to the video. (And if it is, there had better be a good reason.) Couple that with the fact that a portion of my potential audience might have a hearing impairment, and that leads me to think that any product video should still work without the sound. Any music or voice over I consider embellishment only, not essential to get the message across. Besides, putting text on the screen is one of those things that’s super easy to make look professional and snazzy with little to no effort. Why not use a good fraction of my screen time for text?

I decided not to do a voice over reading of the text this time around, and instead only have music for my soundtrack. If you have a good voice (and a good microphone for recording yourself), feel free to talk during your product videos. As long as the message still gets across when the volume is off, you’ll be good either way.

Laying the script into my Final Cut Timeline

The nice thing about having these short lines of text interspersed throughout your video is that they provide a nice pacing mechanism. Some text, a shot of the device, more text, another shot of the device, etc. When you look at it on a Final Cut timeline, it’s very logical and symmetrical.

So for this Fin video, I started by simply laying in the text clips with 3-second-ish spaces in between. I chose a standard title effect from Final Cut’s text effects panel, and typed in my lines. Already, without capturing a single screen grab from the simulator, I had a good idea of what the length and the pace of the video would be. Clips would end up being bumped around a bit before it was all said and done, of course, but I was already able to watch through the video and get a feel for the pace. I could time the individual text clips to make sure I could read them fast enough before they disappeared. And I could use my imagination to fill in each video shot of the product, to get a clearer idea of what I’d need when recording those.

This is also a nice way to feel like you got a lot accomplished in a very short period of time. It’s rewarding, and it’s so easy.

In the next part of this series, we’ll start grabbing the actual footage of our app to fill in the spaces between the lines of text.

1 | 2 | 3 | 4 | 5 | 6 | 7 | 8 | 9 | 10

Anatomy of a Product Video Part 3

This is a series of posts about the making of my marketing video for Fin. You can see the other parts of the series by following the links below:

1 | 2 | 3 | 4 | 5 | 6 | 7 | 8 | 9 | 10

This is part three of a series detailing the process I used to make a product marketing video for my app, Fin. The hope is that I can inspire others to try and make these kinds of videos for their own products, as I think they are pretty essential for selling apps to customers.

In part two, we talked about all the tools we’ll need to make our video. Now I want you to put all of those aside and get out a piece of paper or a note-taking app on your iPad or iPhone. We’re not ready to use any of our fancy video tools just yet.

Start with a Story

Any marketing video should start with a good outline. You’re telling a story, after all, so you need to know what that story is before you capture any footage. Most of the magic of movie making is time spent planning. You need to write, rewrite, refine, and refine again before you even think of launching any video editing app. Otherwise, you’ll waste a lot of effort and spend much more time during the editing stage than should be necessary.

So what is the story? Well, that’s up to you. Watch a dozen good product videos to get inspiration, (Apple’s promo videos are a good place to start) and decide how best to apply that to your particular app.

By the end of the video, the viewer needs to know a few things:

  1. What does your app do?
  2. How will it improve his or her life?
  3. What are the distinguishing characteristics that make this app better than other similar products?

The first one sounds obvious, but you’d be amazed how many times I’ve spent twenty minutes on a product web site and still walk away not knowing what the thing does, exactly. Be clear and concise. Your viewer is going to give you very little time to get this across before clicking away to something else more compelling.

Apple goes as far as recommending that every app you build have what’s called a “definition statement.” If you don’t have one for your app, you really need to write one. It’ll go a long way to guiding your video and all the marketing materials you create.

The definition statement is a simple, single, declarative statement that describes what your app does.

For Fin, my statement would be this: Fin is an app for people who need a non-disruptive way to track time. I also created a shorter version as a tagline—Fin: A Timer for Performers. The tagline fits nicely into a web site header and a video establishing shot. If you do anything performance-based, and you need to keep track of your time slot without distracting the audience, this is the app for you.

Once you cover what the app does, you need to convince your viewer that he or she needs it. All advertising comes down to convincing people that your product will make their lives better. There are all sorts of situations where having a large running timer on an iPad or iPhone would come in handy. I mention a handful in my video: Giving a presentation on stage or in school, playing music, recording a podcast, keeping a conference with multiple speakers on schedule. You may come up with dozens of these when you brainstorm for a while. Try to narrow it down to the core four or five.

Finally, some distinguishing characteristics. Chances are there’s already another app that does what your app does. Or there may be several alternatives that aren’t even apps. You could put a watch on your podium and keep track of time while talking. How is using Fin better? This part of the video story will be mostly about the app’s main features. Be careful not to overwhelm your viewer with every single detail of how the app works. That’s a job for the documentation on your App Store page and on your web site. The video is meant to whet the appetite, not be a canonical reference to everything your app can do. Stick to the big core features that you think are most important to the viewer and help you stand out from the competition. You want to keep the total running time of your video under two minutes if at all possible. Thirty seconds would be even better, if you can pull that off.

For Fin, the big distinguishing characteristics are the large, readable typeface, colorful warnings at certain milestones (ten minutes remaining, five minutes remaining, two minutes remaining), and the ability to make settings changes even after the timer has been started[1].

Once I knew what I wanted to say, I started writing up a series of statements to fill in that story. The basic structure of the video is to introduce the product, list some use cases, show off some features, then reinforce the product name and let folks know where to get it. Short and sweet.

So the script for my video ended up looking something like this:

How Much Time Do I Have?

Let Fin Keep Track of it For You

Live Stage Performance, Podcast Recording, Business Meetings, School Presentations, Conference Scheduling

You’ll always know when to wrap things up

Get a warning when time is running out

Count upwards or downwards

Add and subtract time with simple swipes, even while the timer is running

Get to your settings fast, and change them on the fly

Use during rehearsals to determine how much time you need to add or cut

Fin

A Timer for Live Performers

Available only on the App Store

Once I started putting the shots together, I ended up tweaking that text a bit. But this script gave me a really solid outline on which to base my entire video. I was well on my way already.

In the next part of this series, we’ll discuss whether or not to use voiceovers or on-screen text, and get to the early stages of layout on our video timeline.

1 | 2 | 3 | 4 | 5 | 6 | 7 | 8 | 9 | 10

- - - - - -
  1. Most timer apps, like Apple’s built in Clock app, only let you set up a timer and then hit start. You can pause the timer, but if you decide half way through to add an extra five minutes, you can’t do that without starting over. Fin lets you make all sorts of changes, including whether you want the timer to count up or down, after the timer is already in motion.  ↩

Anatomy of a Product Video Part 2

This is a series of posts about the making of my marketing video for Fin. You can see the other parts of the series by following the links below:

1 | 2 | 3 | 4 | 5 | 6 | 7 | 8 | 9 | 10

In this series, I’m detailing the process of making a product marketing video for my app, Fin. The hope is that I can inspire others to try and make these kinds of videos for their own products, as I think they are pretty essential for selling apps to customers. We may not all have the budget to hire a pro team to make super-awesome videos for us, but we can make something worthwhile if we put in some time and effort (and just a bit of money).

The Budget

So what do I mean by “much smaller budget”? Unfortunately, you will still need a few things to make your video happen, and they’re not all free. And it’s important to note that you have to spend the time to learn these tools and actually create the video, which is also not “free” of course. (Like I said earlier, pro video people are totally worth what they charge.) But if you just don’t have that money to spend on a team of pros, and you have any interest in the art of product video marketing, you can get the job done and learn a lot in the process without spending nearly as much cash.

Here’s a list of all the things I used on the Fin marketing video:

  • iPhone Simulator (Comes with Xcode, so no cost there)
  • ScreenFlow – for screen captures. There are other alternatives, but I like this one. $99.
  • Final Cut Pro X – $299.99 – much maligned by the pro video community when it first arrived, this is actually a perfect tool for making smaller product videos. I learned the old Final Cut Pro back in the day, and for someone like me who only dabbles in video, this new version is a hundred times easier to learn.
  • Motion – $49.99. Not essential, but a great tool for really polished text and camera effects. I always use Motion to create my intro and outtro logo animations, among other things. Final Cut has some similar animating capabilities, but you’ll be able to do much more with this. Consider it a “nice to have” as opposed to an essential tool.
  • Photoshop – $19.99 per month as a single app license. $49.99 per month for a full license to the entire Creative Suite. I used this to manipulate a transparent frame of the various iPads and iPhones I’d be dropping into the background behind my screen grabs, as well as to work on a hand image I needed to show screen swipes. You can find PNGs of ready-made graphics for you elsewhere on the web, so having this app is pretty optional for this process. You can also use a much more affordable tool like Acorn for your photo manipulation needs.
  • Logic Pro X – $199.99 If you want to create your own soundtrack, rather than licensing pre-existing music, Logic is a great choice. Even if you’re not necessarily a pro engineer or musician, you can actually create decent background music with the provided loops and sound effects. If nothing else, there are complete, license-free jingles included with the package as well.

I’m assuming you already own a Mac and have Xcode installed, of course. Otherwise, you wouldn’t have a product to be marketing.

The grand total, if you had none of these and you wanted to use all of them, even the optional ones, is $648.97 (plus $20 a month for Photoshop). That may look like a lot, but keep in mind that there are free or lower-cost alternatives to most of these products, and you only have to front this cost for your first video. Replace Final Cut Pro with iMovie, and Logic with Garageband, which are both free and somewhat capable, and you’re already down to $148.99. You can get a free 30-day trial of Photoshop and create the PNGs of your iPhone and iPad frames in a few minutes. Or download some images of iPads and iPhones you find from many designers on the web. In either case, you’ll have a very hard time finding a professional video company willing to make you a video for less than $700.

(Of course, what you spend in your own time is another story. As a frame of reference, it took me the better part of one day to do the entire Fin video, but this wasn’t my first time around with Final Cut Pro and the other apps involved. Your mileage may vary.)

My advice: buy these items one at a time as you get to making more videos for more products. Start with Final Cut Pro X, as it is far more flexible than iMovie. Use free alternatives for everything else in the meantime.

When I set out to make my video for Fin, I already owned all of these tools from previous projects. So my software cost was effectively zero for all of this. You’ll be able to say the same on your fourth or fifth video.

In the next part of the series, we’ll start the process of making our video with the most important tool of all: a pencil. (Or a note-taking app, if you don’t like kicking it old school.)

1 | 2 | 3 | 4 | 5 | 6 | 7 | 8 | 9 | 10

Anatomy of a Product Video Part 1

This is a series of posts about the making of my marketing video for Fin. You can see the other parts of the series by following the links below:

1 | 2 | 3 | 4 | 5 | 6 | 7 | 8 | 9 | 10

In Episode 18 of Release Notes, the second part of our discussion on product web sites, I mentioned that promotional videos were something I considered to be almost essential. Particularly with the new minimalist design of iOS 7, it’s very hard to communicate your app’s design without being able to show it off in motion. Screenshots, no matter how dolled up with fancy text overlays, don’t cut it in today’s app market. You won’t make the sale.

In that same episode, I also talked with Charles about the costs of having one of those videos made by a professional team, and how that cost can be a nonstarter for most indie developers trying to launch a new, unproven product.

No doubt, if you want a really pro-level video, such as this one, or this one for your product, you’re going to need a budget in the thousands (USD). And looking at the results, you can see clearly the money is well spent. However, given that many apps never make much more than a couple thousand dollars in their lifetimes, it is hard to convince most indies that spending that much on a video will improve sales enough to justify that cost. Maybe on your third, or fourth, or fifth app, when you have more budget to reinvest in your apps, you can take that leap. But in the early development of your company, it’s just not feasible.

Fortunately, as I mentioned that day on the podcast, you can make a video yourself on a much smaller budget. It may not be quite as polished as what the pros do, but it will be enough to present your product in a positive way. And it’s certainly better than having no video at all.

Product Videos on a Budget

The trick to making a video on a budget that is still a good reflection of your product and brand is to avoid the part of those videos that costs the most and looks the worst when it’s done wrong: the live action shots.

To film live action, you need professional lighting. You need settings that can be manipulated to suit the needs of the story. And you need actors to perform the action. You also need to know a thing or three about how to position your camera so that you don’t see it in the screen reflection. And on and on. Believe me, I’ve tried many times to take a video of an iPad or iPhone being manipulated by a real human, and it always comes out looking amateurish without the right equipment and expertise.

And an amateurish video is the one thing that’s worse than having no video at all.

Live action is without question the hardest part of the product demo. Even if you have some knowledge about the logistics of camera placement, and you have a team that’s charismatic enough (and willing) to appear in the video so you don’t need to hire actors, you can’t get past the need for pro lighting.

Fortunately, live action is not 100% necessary. You can accomplish quite a bit with screen captures and some clever animation, if you get creative enough.

Over the next days, I plan to detail the making of my latest product video for my new app, Fin. Hopefully, it will inspire other indies to consider making videos for their apps, even if they don’t have the budget to spend on a really high-end pro video just yet. It’ll at least put you in a state of mind where you consider a promo video a valuable tool in the overall marketing plan.

1 | 2 | 3 | 4 | 5 | 6 | 7 | 8 | 9 | 10